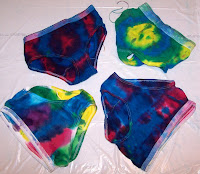

I was out doing some shopping the other day and came across a tie-dye kit on clearance. I did tie-dye once or twice as a kid and really enjoyed it, so I decided to give it a whirl. The box said the Mega set I got would do up to 20 shirts - we did 18 things. Not just shirts, but underwear and onsies too. If I do one, I do 50. And, it was a LOT of fun. Back when I was in high school, homemade tie-dye did not come out bright and with lots of colors. Times have changed. We got bright colors and lots of them. The shirts came out looking like something you would buy, not something you did on the back porch. However, there are a few tricks I learned, so let me share with you.
So, basically the process works like this: You prep your shirts according to what you want them to look like. Then you mix your dye and put on your gloves. Take your shirts out back, apply dye, stick them in a plastic bag for 6-8 hours, take them out, cut off the rubber bands, rinse under warm water, and wash in as hot a water as is appropriate for the fabric type. Don't wash them with anything else for a few more cycles, because they are said to run. Today, Joy took off the pair of dyed panties she was wearing to try on a bathing suit, and she had blue, pink and purple dye on her skin. It was pretty cute, but considering they were washed before she wore them, I would guess there will be more dye coming off in the wash. This is our mess immediately after being removed from the bag:
So, if you want your shirts to look like this:
Choose the point at which you want the burst to start, pinch that point, and lift the shirt up from there. Use your rubber bands to section it off, and apply colors to each section. These are the tube-y looking ones in the pictures.
If you want swirls (obviously my favorite):
Lay your piece out flat and choose your center point. Grasp the fabric there and twist it around that center point. Try to keep your fabric lying flat so that eventually you have a swirl and a circle. Use your rubber bands to enclose that swirl. Squirt your dye on the shirt as if tracing and then filling in pieces of a pie.
Color blotches:
Lay the shirt out and pull up sections. Wrap a rubber band at the base of each section. Squeeze one color on the rubber banded section and another over the other areas. Pretty simple, but pretty cool.
If you want a design to show up, don't use something little like underwear!


3 comments:
Oooohh...Very nice pictures there, Tara...
I have a question/suggestion...does it say anything about NOT using Vinegar? The reason I ask, is whenever we bought new jeans as teenagers, especially if they were a dark wash...my dad would have us put like a 1/4cup or so of vinegar in the wash before we wore them..that way the colors didn't run onto our clothes. I found this especially nice once I started wearing garments. I forgot to do the vinegar wash only one time. ;)
That was a long explanation...but, you have more to read, and enjoy from yours truly... ;)
Wow, I am impressed!! The colors turned out so good!! I've never seen them that vivid!!! It almost makes me want to try. They turned out so cute!!
Oh my gosh... you have uber skills. Seriously. I can sense a good YW activity!!!
Post a Comment